
Maintaining Your Vehicle’s Finish After Body Repair is essential for preserving its value, appearance, and long-term protection. These concise, expert-backed insights make it simple for Dallas drivers to protect their investment and keep that flawless, fresh-from-the-shop look.
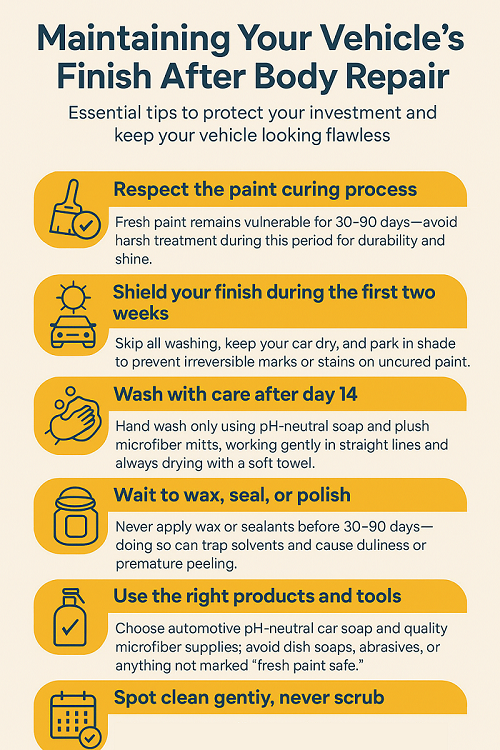
- Respect the paint curing process: Fresh paint remains vulnerable for 30–90 days—avoiding harsh treatment during this period is critical for durability and shine.
- Shield your finish during the first two weeks: Skip all washing, keep your car dry, and park in shade to prevent irreversible marks or stains on uncured paint.
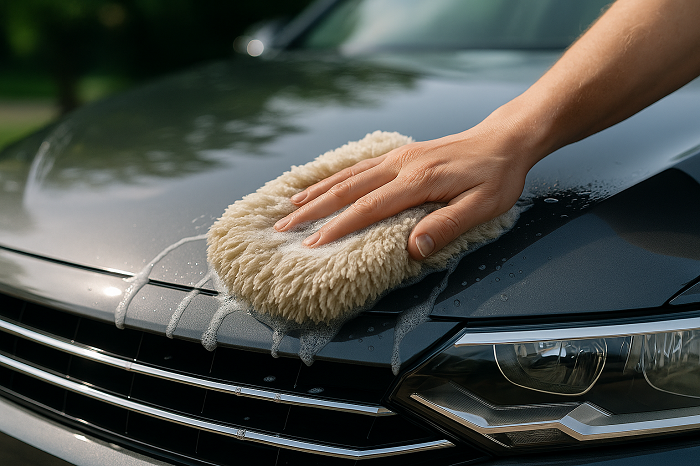
- Wash with care after day 14: Hand wash only using pH-neutral soap and plush microfiber mitts, working gently in straight lines and always drying with a soft towel.
- Wait to wax, seal, or polish: Never apply wax or sealants before 30–90 days—doing so can trap solvents and cause dullness or premature peeling.
- Use the right products and tools: Choose automotive pH-neutral car soap and quality microfiber supplies; avoid dish soaps, abrasives, or anything not marked “fresh paint safe.”
- Spot clean gently, never scrub: Dab contaminants like sap or bird droppings with a clean, damp microfiber towel, and call your repair shop for stubborn spots to avoid permanent damage.
- Schedule a 30-day professional check-up: An expert inspection can catch curing or finish issues early, ensuring your repair meets high standards and protecting your investment.
- Follow a proactive maintenance routine: Hand wash regularly, inspect quarterly, and consider professional treatments like ceramic coatings or paint protection film after full cure for maximum durability.
For complete peace of mind and a brilliant finish that lasts, read the full guide for step-by-step aftercare and professional maintenance tips from Dallas’s trusted auto repair specialists.
Introduction
Picture this: Your car emerges from the repair shop with a flawless, mirror-like shine—only to lose its luster within weeks because of a single misstep in aftercare.
If you’ve ever wondered why that showroom glow can fade so quickly after a body repair, you’re not alone—and you’re not powerless.
New paint is at its most vulnerable for up to 90 days after repair, meaning the smallest decisions now can safeguard your investment—or lead to costly regret later.
Many Dallas drivers are surprised to learn that just one automatic wash, a streak from harsh soap, or a neglected spot of bird droppings can make or break a fresh finish.
That’s why understanding the right way to maintain your vehicle’s paint isn’t just about keeping it pretty; it’s about protecting your car’s value, longevity, and your peace of mind.
This guide breaks down everything you need to know to keep your paint flawless, including:
- The science of paint curing—and why “dry to touch” doesn’t mean “cured”
- First-month care essentials: what to avoid, how—and when—to wash, and key warnings for that critical 30-day window
- The safest products and tools to use (and which ones can secretly destroy fresh repairs)
- When it’s finally safe to wax or seal, and the long-term steps that guarantee lasting shine
We’ll also share pro-level checklists and expert tips so that every drive feels like your car just left the shop.
Ready to protect your investment with confidence?
Let’s look under the surface and see what really happens during the crucial paint curing process—and how you can get results that truly stand the test of time.
Understanding the Paint Curing Process
When your vehicle rolls out of the body shop with a brand-new finish, that paint isn’t at its final strength just yet.
Beneath the glossy look, a critical process called paint curing has only just begun—a stage that determines how long your car’s color truly lasts.
What Is Paint Curing?
Unlike drying, which makes the paint “touchable” within hours, curing is a slow chemical reaction—paint molecules cross-link and solvents escape, creating a tough, protective shell.
Picture this: under that flawless surface, the paint is still “breathing,” releasing gases and moisture for weeks.
How Long Does Curing Take?
The full cure can take anywhere from 30 to 90 days.
Timelines depend on several real-world factors:
- Temperature: Warm, steady climates speed up curing; chilly or fluctuating temps slow it down.
- Humidity: High moisture in the air extends curing time.
- Paint Type: Modern urethanes often require more time compared to some factory-applied systems.
This means your new paint job is most vulnerable during its first 1-3 months—gentle treatment is non-negotiable during this window.
Dry-to-Touch vs. Fully Cured: Key Differences
It’s easy to confuse a “dry-to-touch” panel for a completed paint job, but there’s a crucial difference:
- Dry to Touch: Feels solid after 8–24 hours, but still soft underneath and not chemically stable.
- Fully Cured: Only after 30–90 days does the paint reach true hardness and resilience.
Factory paint jobs are force-cured in controlled environments; repairs done at body shops always require extra at-home care.
Why Gentle Care Matters Most
During the curing phase, even small mistakes—like a trip through an automatic wash or an accidental bird dropping—can leave deep, permanent marks.
- Avoid harsh cleaners, abrasion, or sealing products until the pro-recommended cure time has passed.
To protect your investment, think of every day in the first month as crucial for the life of your vehicle’s finish.
The key takeaway: treat fresh paint with extra care for at least the first 30-90 days. This sets the foundation for decades of shine, value, and peace of mind—the expert way.
The Critical First 30 Days: Essential Do’s and Don’ts
The Initial Two Weeks: Maximum Protection
For the first 14 days after a body repair, your vehicle’s finish is at its most vulnerable—think of it like fresh paint on canvas, easily marked or marred.
Avoid all washing and any moisture exposure during days 1–14. Even light rainfall or dew can affect the chemical bonding of uncured paint, risking permanent surface flaws.
Park smart to reduce exposure to the elements:
- Choose shaded or covered parking whenever possible
- Keep your vehicle away from trees, birds, and overhanging branches
- Steer clear of construction, dust, and high-pollen areas
Fresh paint attracts trouble: tree sap, bird droppings, pollen, and industrial fallout can chemically burn or permanently stain uncured surfaces in a matter of hours.
If an accident happens:
- Do not scrub or wipe affected areas.
- For sticky or corrosive contaminants, call your repair shop for support—expert advice is often free, and aggressive cleaning almost always leads to regret.
- Spot a simple, dry dust layer? Very gently use a clean microfiber towel with no pressure, but only if absolutely necessary.
“The first two weeks can mean the difference between a finish that dazzles for years—or one that dulls before its time.”
Weeks Two to Four: Gentle Washing & Maintenance
After day 14, a hand wash is safe—with the right technique.
Follow these step-by-step best practices:
- Only use lukewarm water and pH-neutral car soap—formulated for automotive paint.
- Choose plush, clean microfiber mitts and towels; avoid anything abrasive.
- Wash in top-to-bottom, straight-line motions (not circles), and always work in the shade.
Drying matters as much as washing:
- Always pat-dry with a soft microfiber towel—never drag, rub, or air-dry.
- Prevent water spots by drying every section immediately; uncured paint can etch fast.
Washing frequency:
- Once a week at most during weeks 2–4.
- Never use automatic or high-pressure washes within the first six weeks—these environments are notorious for swirling and scratching soft paint.
“Clean hands, soft towels, and patience are your vehicle’s best friends during the first month after repair.”
Sensory Scenarios & Timely Reminders
Picture this: The gleam of your fresh finish under Dallas sun—untouched and flawless, because you kept it cool and covered. Or, imagine the sinking feeling of discovering a bird dropping you can’t safely remove—sometimes, the best action is to reach out for help.
Early discipline equals years of shine and peace of mind. Protect your investment by following this simple 30-day rulebook, and you’ll enjoy a finish that truly lasts.
Choosing Safe Products, Tools, and Techniques
When it comes to caring for freshly repaired paint, what you use matters just as much as how you use it.
Choosing the right cleaning products and techniques is the safest way to protect your finish during this delicate stage—mistakes now can leave lasting marks or worse, force a costly return to the body shop.
The Must-Have Cleaning Products
Always reach for products labeled pH-neutral and specifically safe for fresh paint.
Look for these on store shelves and in your detail kit:
- pH-neutral car wash soap (marked “safe for newly painted surfaces”)
- Soft, plush microfiber wash mitts
- Clean, high-quality microfiber drying towels
Anything labeled “coating safe” or “fresh paint approved” is your best friend until the cure window passes.
“Picture this: You invest in a premium microfiber mitt and glide it gently across your new paint—no cuts, no scratches, just peace of mind.”
Products and Materials to Avoid
Plenty of household products promise a sparkling finish, but they can destroy uncured paint.
Steer far clear of:
- Dish soap, laundry detergent, or all-purpose household cleaners
- Any waxes, sealants, or polishes until 30-90 days have passed and your shop gives the green light
- Abrasives, including clay bars or scratch removers
Using the wrong product can strip essential oils, trap solvents, or leave scratches behind.
One wrong move—like using a clay bar—can “instantly undo weeks of perfect curing.”
Microfiber Care: Hidden Key to a Flawless Shine
How you care for your cleaning tools makes a real difference.
Follow these best practices:
- Wash microfiber towels and mitts separately from regular laundry
- Never use fabric softener—it leaves behind residues that streak or cloud fresh paint
- Dry on low heat or let air dry to maintain softness
A clean towel means safer, streak-free results and fewer swirl marks.
Spot Cleanup and Gentle Handling
If a spot, smudge, or mark appears, touch it with care.
- Pat, don’t rub—dab gently with a damp, clean microfiber towel
- Use only water, no cleaners or sprays
- If the mark resists, call your repair shop for advice before attempting more
“Treat your curing paint like delicate glass: if in doubt, stop and ask a pro.”
Keeping your finish flawless comes down to the right choices—safe products, gentle tools, and careful techniques always win. Make these habits automatic now, and your paint will stay brilliant for years to come.
Waxing, Sealants, and Long-Term Paint Protection
When and Why to Apply Protection
Fresh paint may look stunning, but protecting that finish too soon can actually cause lasting damage.
Body shops routinely recommend a wait time of at least 30–90 days before applying any wax, sealant, or polish. This window allows solvents in the new paint to fully evaporate and the coating to completely harden.
Attempting to wax or seal your car before this period risks:
- Trapping solvents beneath the surface
- Creating poor product adhesion
- Causing unsightly clouding or streaking in your finish
Every shop’s advice is slightly different—always ask for specifics on your repair. Cooler temperatures or thicker paint jobs may require waiting 60 or even 90 days.
“Think of your paint like freshly-poured concrete—it may look dry, but it’s still hardening deep down.”
Choosing the Right Protection: Wax vs. Sealant
Once your paint is cured, you can boost shine and extend surface life with these options:
- Carnauba wax: Delivers classic, deep gloss and strong water beading but needs reapplying every 2–3 months.
- Synthetic sealants: Offer longer-lasting protection (4–6 months or more), resist the Texas sun, and are easier to apply evenly.
How to Wax Without Risking Swirls
Protect your professional finish by following these steps:
- Wash the vehicle thoroughly with a pH-neutral car wash.
- Use a clean, plush microfiber applicator or pad.
- Apply wax in thin, straight lines—never circles.
- Wait for haze, then buff gently with a separate microfiber towel.
- Inspect in sunlight for missed spots or streaks.
Never use machine buffers, abrasive pads, or multi-purpose “cleaner waxes” on fresh repairs.
Picture this: It’s sunny, you glide your hand across a buttery-smooth hood, and see only flawless reflections.
Advanced Protection: PPF & Ceramic Coatings
For even stronger, longer-lasting defense, consider:
- Paint protection film (PPF): A clear, nearly invisible layer that guards against chips and scratches. Apply only after 45–60 days.
- Ceramic coatings: Provide years of chemical and UV resistance, but must be installed by a pro—also safest after full cure.
Target these protective upgrades for:
- Front bumpers
- Hoods
- Mirrors
- Any high-impact, bug/scratch-prone zones
A smooth, streak-free application is best handled by experienced shops—especially for PPF or ceramics.
For Dallas drivers, investing in added protection shields your vehicle from harsh sun, debris, and city grime.
Proper application—at the right time—locks in the results of professional repair. A little patience gives paint a lifetime of gleam and resale value.
Remember: “Protect your investment when the time is right, and your car’s finish will thank you for years to come.”
Professional Follow-Up and Scheduled Maintenance
Scheduling a professional inspection 30 days after your body repair isn’t just a suggestion—it’s a safeguard for your investment. At this early milestone, an expert’s eye can spot issues you might not recognize but that could affect the integrity and appearance of your vehicle’s finish for years to come.
What Technicians Look For at 30 Days
Picture this: you roll your freshly repaired car into the shop and a trained technician examines your paint under optimal lighting, searching for:
- Uneven curing (soft spots, sticky patches, or color variations)
- Panel misalignments—sometimes so subtle only a pro will spot them
- Surface flaws like dust specks, orange peel texture, or micro-scratches
These early checks help ensure every detail meets both your expectations and factory standards.
“What you don’t spot in month one can become a costly fix later—invest in prevention, not correction.”
Your Long-Term Maintenance Schedule
Maintaining your vehicle’s shine doesn’t have to be overwhelming. Set a simple but effective schedule:
- Hand wash weekly or monthly, always using microfiber mitts and pH-neutral soap
- Quarterly inspections—either at home or professionally—for chips, scratches, and wax coverage
- Annual or bi-annual reapplication of wax, sealant, or ceramic coatings for lasting protection
This routine keeps your paint looking “fresh from the shop” long after the repair.
When to Call in the Pros
Once your paint is fully cured (usually at the 90-day mark), think about upgrading your finish with professional treatments:
- Paint correction to remove swirl marks or minor imperfections
- Machine polishing for added gloss and depth
- Ceramic-coating or paint protection film for robust, long-lasting defense (especially popular for Dallas drivers facing sun, construction debris, and city grime)
A true professional won’t just add shine—they’ll give you peace of mind.
“A small check-up today can prevent a major problem tomorrow.”
Why Scheduled Maintenance Pays Off
Regular follow-ups and a proactive care routine go beyond just keeping your car glossy. You’re:
- Safeguarding resale value
- Protecting against costly re-repairs
- Ensuring the finish matches the quality you paid for
Smart owners know: a reliable schedule and expert check-ins aren’t an extra expense—they’re the secret to lasting satisfaction, inside and out.
Preventing and Correcting Common Aftercare Mistakes
Caring for your vehicle’s paint after a body repair isn’t just about good looks—it’s about protecting your investment and ensuring repairs truly last.
One wrong move during the next 30 to 90 days can spell trouble for your finish.
The Most Common Paint-Damaging Mistakes
Paint experts see three critical errors sabotage new finishes again and again:
- Waxing or sealing too early: Applying protection before the paint is fully cured (minimum 30–90 days) traps solvents, causing premature dullness, clouding, and peeling.
- Using automatic car washes: The high-pressure water, detergent, and abrasive brushes in drive-through car washes can shred soft, uncured paint—avoid them for at least 60 days.
- Aggressive contaminant removal: Scrubbing bird droppings, sap, or dust with pressure can embed scratches and stains into a still-soft surface.
“One impatient car wash can undo an entire repair,” is advice every Dallas car owner should remember.
Gentle Recovery From Everyday Hazards
Life happens—if your car does get hit with tree sap, bird droppings, or pollen, act with care:
- Blot, don’t rub: Gently blot the spot with a clean, damp microfiber towel. Never scrape or scrub.
- Seek expert help: If a stain won’t budge or feels risky, call your body shop for professional advice—protecting a $2,000 paint job is worth a quick phone call.
- Patience pays off: Small cosmetic flaws are much easier to correct once your paint is fully hardened.
Picture this: A freshly repaired hood, struck by a stubborn drop of sap. Instead of reaching for harsh cleaners, you blot gently, preserving that clear, mirror-like shine.
Fast-Track Reference: Aftercare Do’s and Don’ts
| Stage | Do | Don’t |
|——————|————————————-|————————————-|
| 0-14 days | Park in shade, keep dry, spot-clean only if needed | Wash, wax, or use car covers |
| 15-30 days | Gentle hand wash with microfiber, inspect regularly | Use pressure washers, visit auto washes |
| 30-90 days | Ask about waxing or sealants, continue hand washing | Apply any polish or abrasive products |
A perfect finish isn’t a mystery—it’s a result of everyday attention and expert guidance.
Mistakes are easy to avoid when you know what to skip and when to ask for help.
Each small act of care now will protect your paint’s gloss, resale value, and your peace of mind for years to come.
Conclusion
Choosing the right aftercare for your vehicle’s finish isn’t just about protecting paint—it’s about securing the value, pride, and enjoyment you get from every drive.
By investing a little extra patience and precision now, you’re setting your vehicle up for years of standout shine and confident ownership.
—
For the best results, focus on these essentials:
- Treat fresh paint with care: Always wait the recommended 30–90 days before waxing or sealing your newly repaired finish.
- Hand wash only with pH-neutral soap and microfiber: Avoid automatic washes, harsh cleaners, and rough materials until the paint is fully cured.
- Respond gently to everyday messes: Blot, don’t scrub. When in doubt, call your body shop for expert advice—never risk a rushed fix.
- Schedule a 30-day follow-up: Bring your car back to the shop for a professional inspection to ensure lasting integrity.
- Invest in long-term protection: Consider professional-grade waxes, sealants, or coatings once your paint is fully cured.
—
Your next moves are simple but powerful:
- Mark your calendar with your paint cure timeline and stick to it.
- Save your body shop’s contact info for quick support when you spot an issue.
- Share these tips with fellow Dallas drivers who value quality and appearance.
- Book that 30-day professional checkup—your finish will thank you.
—
Every act of careful maintenance builds lasting value for your car and peace of mind for you.
“Protect your repair like a pro, and your investment will keep its shine, mile after mile. Excellence isn’t just for the repair shop—it’s in every choice you make.”
FAQs
1. What is the most important step in Maintaining Your Vehicle’s Finish After Body Repair?
The most important step in Maintaining Your Vehicle’s Finish After Body Repair is protecting the fresh paint during the 30–90 day curing period. This includes avoiding automatic car washes and sealing products. For professional aftercare recommendations, visit our Auto Body Repair Service Page. For more paint-care science, refer to PPG Automotive Paint Technology.
2. When can I safely wash my car after a repair while Maintaining Your Vehicle’s Finish After Body Repair?
Most shops recommend waiting at least 14 days before hand-washing to safely begin Maintaining Your Vehicle’s Finish After Body Repair. Only use pH-neutral soap and microfiber towels. Review our detailed washing instructions on our Auto Body Repair Service Page, or confirm guidelines through Axalta’s Paint Care Recommendations.
3. How soon can I wax or seal the paint when Maintaining Your Vehicle’s Finish After Body Repair?
To correctly manage Maintaining Your Vehicle’s Finish After Body Repair, avoid waxes, sealants, and ceramic products for 30–90 days to prevent trapping solvents. For more long-term protection options, see our Vehicle Finish Care Services, or reference expert paint-curing guidance from 3M Automotive Aftercare.
4. What products should I use when Maintaining Your Vehicle’s Finish After Body Repair?
For proper Maintaining Your Vehicle’s Finish After Body Repair, always use pH-neutral car soap, soft microfiber mitts, and non-abrasive drying towels. Avoid harsh chemicals or clay bars until the paint is fully cured. See our product recommendations at our Auto Body Repair Service Page, or explore industry-approved care products at Meguiar’s Official Care Guides.
5. Do I need a 30-day inspection when Maintaining Your Vehicle’s Finish After Body Repair?
Yes—part of Maintaining Your Vehicle’s Finish After Body Repair is ensuring the paint is curing correctly. A 30-day professional inspection can detect issues early and preserve the repair’s long-term integrity. Schedule one through our Body Repair Service Page, and learn more about post-repair standards from I-CAR’s Collision Repair Resources.