
Discover the essentials of body filler application and safety for durable, flawless auto body repairs. These expert tips help Dallas drivers and DIYers achieve professional-quality results while prioritizing health and vehicle value.
- Body filler restores vehicle surfaces by smoothing dents, scratches, and minor imperfections, creating a paint-ready finish without replacing panels.
- Proper prep is critical—always sand to bare metal and remove all rust before applying filler to ensure lasting adhesion and prevent future cracking or pop-outs.
- Choose the right body filler type for the job: Standard for small dents, medium (fiberglass) for holes/gaps, and premium for the smoothest, most durable finish.
- Use thin, multiple layers—and never over-fill to avoid shrinkage or visible repair lines; allow each layer to fully cure and always feather the edges for a seamless result.
- Safety always comes first—wear nitrile gloves, eye protection, long sleeves, and a respirator; work in a well-ventilated area to guard against harmful fumes and skin contact.
- Master your mixing and timing by following the manufacturer’s hardener ratio and working quickly—most fillers offer just 3–5 minutes of pot life.
- Professional repairs demand thorough inspection—run your palm over the surface and use strong lighting to ensure flawless blending and no pinholes or soft spots before painting.
- Modern innovations deliver faster, cleaner results with quick-drying fillers, digital estimating tools, and upgraded sanding systems, cutting panel repair time by up to 50%.
By following these proven steps, you can achieve safe, high-quality repairs that meet the highest standards of craftsmanship and customer satisfaction. For in-depth guides and expert support, dive into the full article and experience the Auto Clinique difference.
Understanding Body Filler
Ever spotted a dent or scratch on your car and instantly wondered if it could ever look “like new” again—without a sky-high bill?
At Auto Clinique, over 80% of minor cosmetic flaws are repaired using body filler, not costly part replacements. That quick transformation from damaged to seamless isn’t magic—it’s the science and craftsmanship behind expertly applied filler.
But here’s what most vehicle owners don’t realize: a flawless finish starts long before the paint ever dries. The secret? Knowing not just how body filler works, but how quality, safe application ensures your car’s appearance and value stay intact for years.
Understanding body filler means you’ll be able to:
- Spot top-tier repairs—it’s about more than just hiding damage
- Recognize shortcuts that lead to cracking, bubbling, or quick wear
- Stay safer by knowing what professionals do to protect both your car and your health
- Make smarter choices if you ever need a repair or want to handle small fixes yourself
With auto body technology advancing, Dallas shops like ours invest in premium products and the latest techniques to deliver a result you—and your car—can trust.
Whether you’re considering a DIY repair or simply want to feel confident about the work performed on your vehicle, understanding these fundamentals puts you in the driver’s seat.
Many vehicle owners searching for an auto and body repair near me or a trusted paint and body repair specialist want long-lasting results without unnecessary panel replacement. Understanding how professional auto body filler techniques work helps you identify quality craftsmanship and avoid repair shortcuts that may lead to cracking, bubbling, or uneven paint finishes later.
Curious about what actually happens between a dented panel and a showroom-worthy finish? Let’s uncover the role body filler plays in modern auto body repair, starting with the basics you need to know.
What Is Body Filler? Fundamentals and Role in Auto Body Repair
Automotive body filler—most commonly known by the brand name Bondo—is a polyester resin-based material that transforms dented, scratched, or imperfect car panels into smooth, paint-ready surfaces.
This thick paste is a go-to tool for thousands of repair shops nationwide because of its ability to restore vehicles to like-new appearance without the need for panel replacement.
Modern automotive body filler products are designed to restore damaged panels efficiently while maintaining factory-level appearance standards. Whether repairing dents, scratches, or surface imperfections, professional technicians rely on premium body filler for cars to create smooth, paint-ready surfaces before refinishing.
What Does Body Filler Actually Do?
Body filler plays a crucial role in making exterior flaws disappear.
It’s formulated to:
- Fill dents, dings, and shallow surface imperfections resulting from hail, door bumps, or parking mishaps
- Repair small rust spots (only after fully removing all rust down to clean metal)
- Seal minor holes or deep scratches that don’t compromise the structural integrity of the panel
Picture this: after a stray shopping cart leaves a thumb-sized depression on your car door, a technician skillfully fills and reshapes the spot using body filler before refinishing it with fresh paint—making the damage as if it never happened.
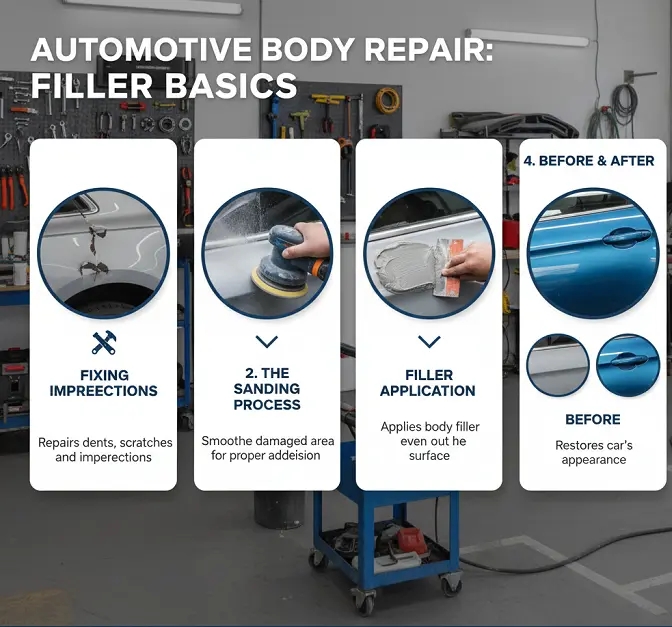
Where Filler Fits in the Repair Process
Body filler is not a one-step fix.
It’s an essential link in the workflow between:
- Surface prep—cleaning, sanding, and removing rust to ensure a strong bond
- Application and shaping—filling the imperfection with multiple thin layers for best results
- Sanding to perfection—creating an ultra-smooth surface ready for primer and paint
Using filler is the step that blends repairs seamlessly, so the final paint job looks flawless.
Why Quality Application Matters
A quality repair isn’t just about good looks.
Proper filler use means:
- Safer repairs—Only non-structural areas should be filled; never use it for damage on frames or vital supports.
- Long-lasting results—A well-bonded, smoothly sanded filler won’t crack, shrink, or show through the paint over time.
- Integrity of the finish—Careful feathering avoids visible lines or spots.
Applying filler with integrity upholds Auto Clinique’s commitment to transparent, high-quality service and customer satisfaction.
When you see your vehicle transformed from battered to beautiful, remember: expert filler work is what makes those repairs invisible. A flawless finish begins long before the paint ever touches your car.
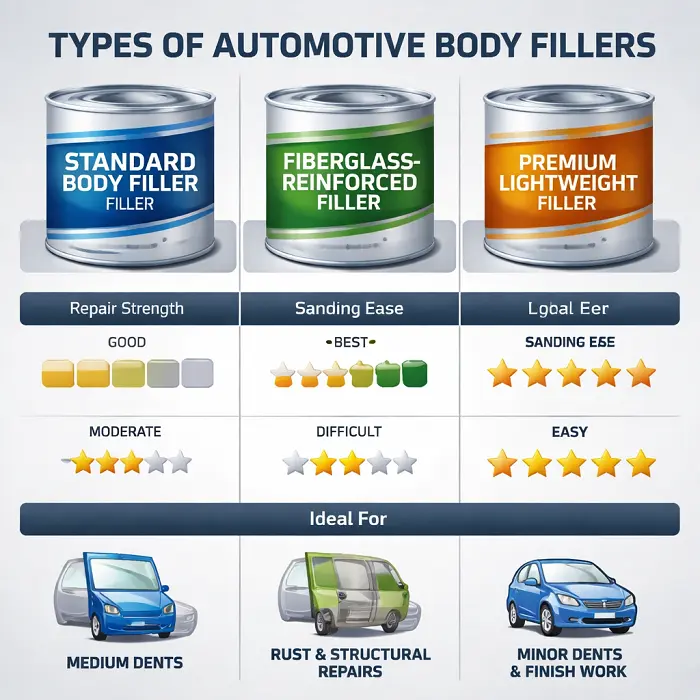
Types of Body Filler: Features, Selection, and Best Uses
Automotive body filler comes in three main types, each engineered for specific repair needs.
Think of it as choosing the right tool for the job—using the wrong filler can cost time, money, and a flawless finish.
Major Types at a Glance
- Standard (Lightweight) Filler: Made with polyester resin, dries in 20–25 minutes, designed for small dents and scratches on steel.
- Medium (Fiberglass-Reinforced) Filler: Contains added fiberglass for strength, ideal for cracks, holes, or repairs bridging gaps.
- Premium (High-Adhesion, Easy-Sand) Filler: Features advanced resins for superior grip, quick sanding, and larger repair areas—perfect for a showroom-ready finish.
Popular products like Bondo body filler and body filler Evercoat are widely used throughout the collision repair industry because they provide strong adhesion, smooth sanding performance, and reliable durability for both minor dents and larger panel restoration projects
Each type brings a different mix of adhesion, smoothness, and drying times to the table.
Pros and Cons: Choose with Confidence
- Standard Filler
- Pros: Lightweight, easy to sand, budget-friendly.
- Cons: Weaker adhesion; not recommended for galvanized steel, thick layers, or large patches.
- Medium Filler
- Pros: Extremely tough, resists cracking, bridges gaps.
- Cons: More effort to sand, requires thorough surface prep.
- Premium Filler
- Pros: Highest adhesion, sands like butter, smoothest finish—often skips glazing putty.
- Cons: Slightly higher cost, but worth it for seamless look and easier process.
How to Select the Best Filler for Your Repair
Always match your filler to the job for lasting results and peace of mind.
Ask yourself:
- Repair size: Small dents? Go lightweight. Gaps/holes? Use fiberglass medium.
- Panel type: Steel panels work with all types; galvanized steel may need specialty or premium fillers due to adhesion issues.
- Finish goals: For a flawless, nearly invisible fix before painting, premium is the professional’s secret weapon.
Fact: Using the wrong filler over rusty or poorly prepped surfaces can lead to cracking, shrinkage, or visible seams—there’s no shortcut for a “bondo job” done right.
Modern Trends and Innovations to Watch
- Eco-friendly fillers: New low-VOC or waterborne options reduce odor and environmental impact without sacrificing performance.
- Advanced formulas: Quicker curing, better adhesion, and flexible properties make repairs easier and more durable.
- Tool upgrades: Digital mixing ratios, ergonomic spreaders, and dust-free sanding systems are standard in today’s best body shops.
“Don’t just fill—restore with integrity.” Today’s fillers let you match the quality of a factory finish if you follow the right process.
The big takeaway? Choosing the right body filler sets the stage for a strong, beautiful repair—and when in doubt, premium often means peace of mind for both quality and speed.
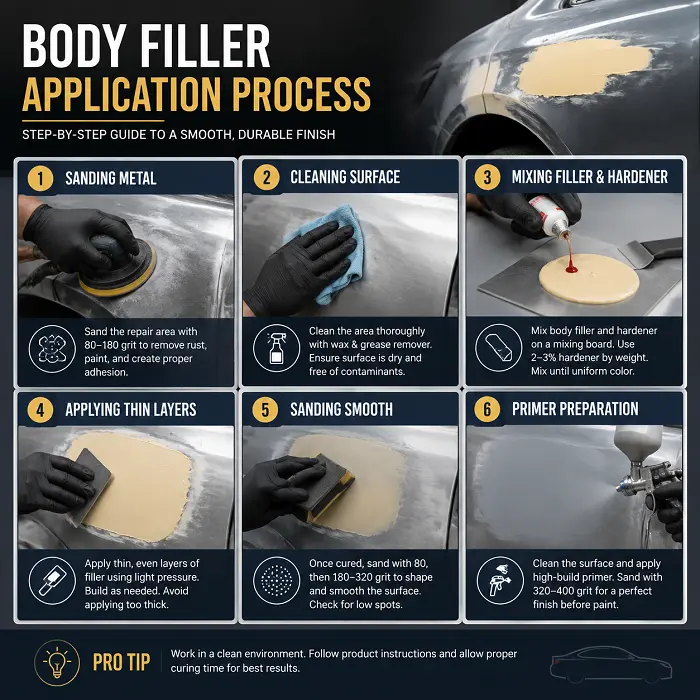
Step-by-Step Application: Techniques for Optimal Results
Surface Preparation
Every long-lasting repair starts with a spotless surface.
Thoroughly clean the area using:
- Warm water
- Bodywork shampoo
- Microfiber cloth
Sanding matters. For maximum adhesion, sand to bare metal when possible, or rough up painted/primed surfaces with coarse sandpaper.
Remove all rust with a grinder—any trace left can ruin the repair. Degrease the area to prevent residue interfering with the filler bond. Dust—wipe it clear so nothing gets trapped beneath.
“A contaminant-free surface is the foundation of every flawless repair.”
—
Mixing Procedures
Body filler works best when mixed precisely.
- Follow the filler-to-hardener ratio from the manufacturer—usually a single line of hardener across a golf ball-sized scoop of filler.
- Mix until you see one uniform color—no streaks.
- Use a non-porous board and a plastic or metal spreader. Cardboard is a no-go since it traps air.
Remember, most fillers give you just 3–5 minutes of pot life. Work quickly and efficiently.
“Proper mixing is 80% of a successful repair—master it, and the rest will follow.”
—
Application Methods
Apply a thin first coat to fill the deepest part of the damage. Professional body filler application requires patience, thin layering, and precise mixing techniques to prevent shrinkage or future cracking. Skilled technicians performing body filler repair work carefully feather the repair edges so the transition between repaired and original metal becomes virtually invisible after painting.
Build up in layers, each slightly thicker, and let each cure before moving on.
- Use a plastic spreader to smooth the filler edge-to-edge.
- Feather the edges as you go, making the transition from repair to original panel seamless.
- Keep levels just below the panel’s surface—paint and clearcoat need their room.
Multiple light layers always outshine one heavy application.
—
Sanding and Finishing Touches
Let each layer dry (about 30 minutes), then sand with:
- 80-120 grit for shaping
- 180-320 grit for finishing
Proper body filler sanding techniques are essential for achieving a flawless finish before primer and paint application. Uneven sanding or rushed shaping can leave visible repair lines that become even more noticeable after the final paint cures.Always suit up with these basics
Finish with glazing putty or spot putty for that ultra-smooth look—this step eliminates pinholes.
Aim for a final surface just below the panel to leave space for paint.
“Professional-grade repairs are built on patience and attention to detail—never skip the final check.”
—
Pro Tips and Troubleshooting
- Practice with different filler types (medium/premium).
- Thin with a small amount of lacquer thinner for easier spreading—but avoid excess to prevent shrinkage.
- Watch for air bubbles, visible seams, or quick drying—these hint at mixing issues or hurried application.
Handling larger damage? Layer gradually, feather wide, and go slow.
—
A smooth, long-lasting body repair comes down to three things: clean prep, precise mixing, and patient layering. Master these steps, and your repairs will stand out for their quality and durability—every time.
Safety First: Health, Handling, and Environmental Precautions
Understanding Body Filler Hazards
Automotive body filler contains chemicals that can irritate skin and eyes, trigger respiratory issues, and—depending on exposure length—pose carcinogenic risks.
Before you ever open a can, take a moment to scan the label and manufacturer’s Safety Data Sheet (SDS). These documents quickly flag hazards and essential precautions in plain language.
If you ever wonder, “Is this stuff safe to touch or breathe?”—stop and check the SDS. One overlooked moment can lead to lasting issues.
- Key stat: Most fillers release fumes with volatile organic compounds; even short-term exposure without protection can cause discomfort.
Essential Personal Protective Equipment (PPE)
A safer repair is a better repair. Always suit up with these basics:
Following proper body filler safety procedures protects technicians and DIY users from harmful fumes, airborne sanding dust, and chemical exposure. Anyone working in an auto and body repair environment should always prioritize respirators, ventilation systems, and protective clothing during repairs.
- Nitrile or chemical-resistant gloves—no bare hands
- Safety glasses or goggles—a splash can sting for hours
- Long-sleeve, resistant clothing
- Respirator with organic vapor cartridges—particularly in enclosed or poorly ventilated spaces
Whenever possible, work outdoors or in a ventilated garage with cross-breezes or exhaust fans.
If someone on your team is pregnant or sensitive to chemicals, extra caution or reassignment is best—no exceptions.
- “You can always sand twice, but you only get one set of lungs.”
Safe Handling, Use, and Cleanup
Keep your space—and yourself—protected by following these essential steps:
- Never eat, drink, smoke, or touch your face during prep or application
- Mix and spread body filler on stable, non-porous surfaces—not cardboard, which can trap chemicals
- Keep the area spark-free; filler and hardener are flammable before they cure
- Store containers tightly closed in a dry, ventilated area, away from direct sunlight or heat
If filler touches skin, immediately wash with soap and water. For eyes, flush for at least 15 minutes and get medical help. Inhaled fumes? Get into fresh air—fast.
Spill? Use absorbent material, ventilate, and dispose of the waste as hazardous material per local guidelines.
Takeaway
“Protect your health—professional results start with safe habits.” A few minutes of preparation can prevent a lifetime of complications. With the right gear, ventilation, and vigilance, you’re set for repairs that look—and feel—right.
Achieving a Perfect Repair: Common Mistakes and Quality Assurance
Avoiding Application Pitfalls
The difference between a flawless repair and a visible patch often comes down to avoiding the most common mistakes from the start.
Picture this: you’ve carefully mixed your body filler, but the color seems streaky. That’s an immediate red flag.
Watch out for these frequent missteps:
- Incorrect hardener ratio: Too much hardener leads to cracks and brittleness, while too little means the filler won’t cure—costing you time and money.
- Improper surface preparation: Neglecting to sand or fully remove rust means even the best filler can fail to bond; this is the #1 cause of repair “pop-outs.”
Many failed car dent filler repairs happen because low-quality materials or incorrect application methods were used. Choosing a premium or fiberglass body filler product can dramatically improve durability for larger repairs and high-stress panel areas.
- Wrong tools or conditions: Applying filler with dirty spreaders, in high humidity, or on a damp panel can cause bubbling, poor adhesion, or persistent pinholes.
Using the right technique with proper tools in correct environmental conditions is the only way to guarantee long-lasting, “invisible” repairs.

Inspection and Testing
First impressions matter—so always use both your eyes and your hands to verify surface smoothness and leveling.
Here’s a quick, pro-level quality check:
- Run your palm across the repair; any hint of a ridge or divot needs more attention.
- Sight across the panel at a shallow angle or under strong light; look for waves, dips, or rough patches.
- Tap the area gently: A dull thud instead of a clear, solid sound signals uncured pockets or poor adhesion.
If you discover:
- Pinholes: Fill with spot putty before priming.
- Lifting edges: Sand away and reapply filler after prepping.
- Soft spots after 24 hours: Remove and redo application—these can ruin a paint job.
Quality Standards and Customer Expectations
True craftsmanship in body filler work means delivering seamless repairs that are impossible to spot once painted.
Set these benchmarks for every job:
- Repairs should be flush and smooth, with no visible lines or transitions.
- All surfaces must be properly sanded, dust-free, and ready for primer.
Keep your customers in the loop:
- Explain the process: Let them know some repairs—like filling holes near panel edges—may not be perfect but will be structurally sound and visually discreet.
- Share expectations: Transparency and professionalism set your work apart, building real trust.
Bringing Auto Clinique’s brand values to every job means every repair is a statement of quality, integrity, and customer focus—our promise to Dallas drivers, guaranteed.
A perfect body filler repair means getting the mix right, prepping with care, and always checking your work—small details lead to big results.
Body Filler in the Modern Auto Repair Shop: Trends and Innovations
Today’s auto repair professionals are transforming body filler work with smarter tools and materials.
Premium fillers—known for their superior adhesion and faster sanding—now dominate quality-focused body shops, making repairs more efficient and reliable.
Picture this: a technician opens a sealed can of high-adhesion filler, mixes it for a uniform color, and uses a precision plastic spreader for flawless layering—minimizing waste and boosting consistency.
Fast Work, Faster Turnarounds
Modern filler products are engineered for speed.
- Quick-drying formulations cut layer curing times by up to 30% compared to legacy brands.
- Technicians can now sand and prime within 30-40 minutes of application, freeing up bays for the next vehicle.
- Advanced spreaders and motorized sanding tools ensure smoother finishes in record time.
Shops using these innovations report reducing their average repair time per panel from six hours to just over three—that’s efficiency your customers notice.
Integrating Filler Work with Digital Systems
Efficiency doesn’t stop with application.
- Digital estimating software streamlines filler use, matching filler type to damage severity instantly.
- Technicians receive digital workflow prompts, ensuring every step meets industry standards—right down to the final sanded finish.
- Repairs are documented for transparency, boosting customer trust.
Environmentally Safer, Smarter Choices
Body shops are rethinking their environmental impact.
- Low-VOC fillers and eco-friendly disposal practices mean safer air for your staff and the Dallas community.
- Many shops now recover up to 90% of sanding dust using connected vacuum systems.
- Proper product selection supports compliance with strict state regulations—protecting both your shop and your clients.
Training and Quality Assurance
Consistent, high-quality results stem from targeted technician training.
- Teams practice on simulation panels with different substrate metals, mastering swift application and sanding.
- Quality control checks—from digital calipers to spotlight inspections—catch flaws before they leave the booth.
You can spot an Auto Clinique repair by its seamless finish and precision detailing, backed by expert craftsmanship.
Smart tools, better products, and responsible processes are helping Dallas shops deliver repairs that last—so every car gets the expert care it deserves. With premium fillers, digital workflows, and a genuine focus on quality, body filler work meets tomorrow’s standards—today.
Expert Insight Paint and Body Repair
Precision body filler work unlocks a higher standard of automotive repair—one that pairs lasting quality with a seamless finish you can trust.
Armed with a clear process and the right safety precautions, you’re empowered to achieve repairs that not only restore your vehicle’s appearance, but also reinforce its value for the road ahead.
—
Key Takeaways to Put Into Practice:
- Prep every surface completely—rust-free, clean, and sanded—to guarantee strong, lasting adhesion
- Choose the right filler for your repair—match type to job size and panel material for a truly flawless finish
- Suit up with essential safety gear—protect your skin, lungs, and eyes every time you handle filler or sanding dust
- Build up repairs in light, even layers—avoid heavy applications for better results and easier sanding
- Inspect with your eyes and hands—check for a perfectly feathered blend before moving to primer and paint
—
Next Steps for Flawless Results:
- Assess your upcoming repair area—then gather all the right tools, PPE, and filler types before you start
- Review the Safety Data Sheet (SDS) for your filler product, and prep your workspace for ventilation
- Commit to patience and quality at each stage, knowing that careful prep and layering pay off in both appearance and durability
—
Every great repair is a reflection of craftsmanship and care—the kind of standard we live by at Auto Clinique.
Choosing the right premium body filler products and professional repair techniques helps ensure smoother finishes, stronger adhesion, and longer-lasting repairs. Whether you visit a professional collision center or handle smaller repairs yourself, quality materials and proper preparation always make the difference.
Invest time in your process today, and you’ll enjoy repairs that stand the test of time—proof that expert auto care always shows in the details.
“Quality isn’t just seen—it’s experienced on every mile you drive. Start strong, finish flawlessly.”
OSHA provides important workplace safety guidelines for collision repair facilities handling automotive body filler, sanding dust, paint fumes, and hazardous repair materials. These recommendations help technicians maintain safer working environments during repairs.
FAQs
What is body filler used for in auto repair?
Body filler is used to repair dents, scratches, dings, and minor surface imperfections on vehicle panels before sanding, priming, and painting. Professional technicians use automotive body filler to restore smooth, factory-like surfaces without replacing entire panels.
What is the best body filler for cars?
The best body filler for cars depends on the repair type. Standard fillers work well for small dents, while fiberglass body filler is better for larger or reinforced repairs. Premium products like body filler Evercoat are preferred for smooth sanding and professional-quality finishes.
How long does body filler take to dry?
Most auto body filler products begin curing within 3–5 minutes and are typically ready for sanding within 20–30 minutes, depending on temperature, humidity, and the hardener ratio used during mixing.
Can body filler be applied over rust?
No. Rust must always be completely removed before applying body filler. Applying filler over rust can cause bubbling, cracking, poor adhesion, and repair failure over time.
What safety equipment should be used when applying body filler?
Proper body filler safety equipment includes nitrile gloves, safety goggles, long sleeves, and a respirator with organic vapor filters. Adequate ventilation is also essential during sanding and application.