
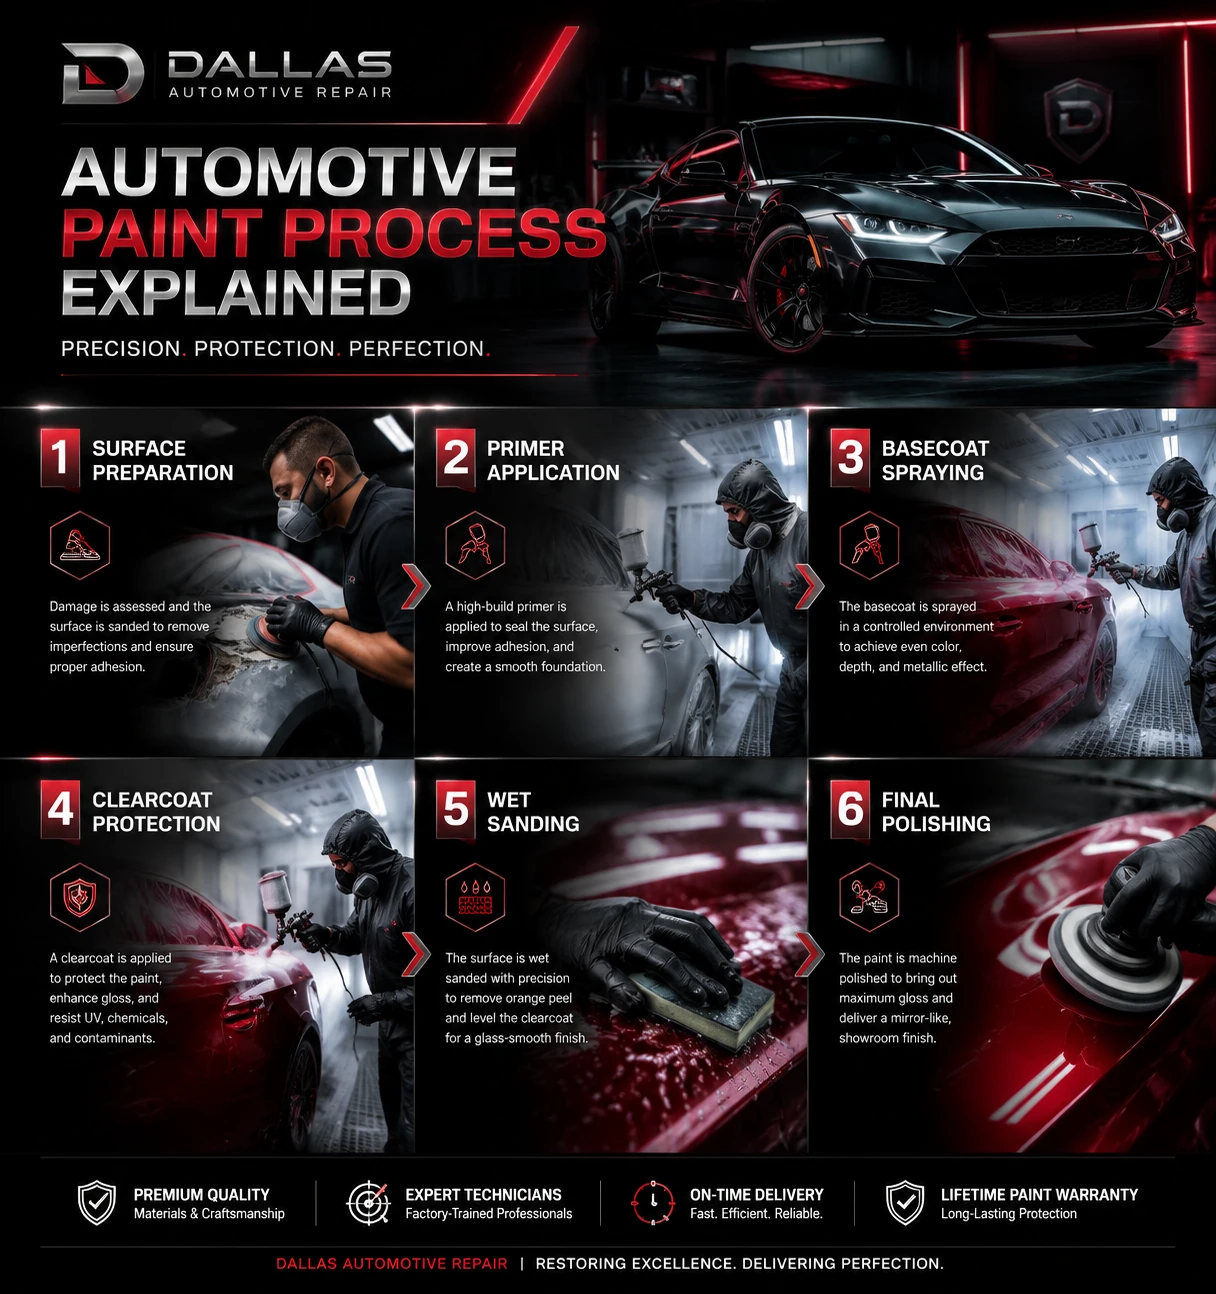
Achieving a flawless automotive paint finish means more than great color—it’s about long-term protection, value, and professional care. Here’s what every Dallas vehicle owner needs to know about the step-by-step paint process that sets expert repairs apart:
- Meticulous surface preparation is critical: Over 80% of paint failures come from skipped prep, so invest extra time in cleaning, sanding, and masking for a finish that lasts up to 5-7 years.
- Primer creates lasting adhesion and protection: Choosing the right primer—like etching or high-build—seals out moisture, hides imperfections, and sets the foundation for vibrant, resilient color.
- Basecoat application demands precision: Use multiple thin coats and professional spray techniques to achieve even color, seamless matching, and stand-out gloss, whether using solvent or eco-friendly waterborne paints.
- Clearcoat is your car’s shield and shine: Applying 2-3 layers of high-solids, UV-resistant clearcoat delivers true showroom gloss and safeguards against Texas weather, fading, and wear.
- Wet sanding and polishing delivers a flawless finish: Progress through 1200 to 2000 grit wet sanding and dedicated compounds to achieve a mirror-smooth, haze-free surface that turns good work into great.
- A dust-free environment and tool hygiene prevent costly rework: Always maintain a clean spray zone and equipment—just one speck of dust can mar a perfect job and triple rework time.
- Respect flash and cure times for durability: Never rush primer, base, or clearcoat drying—patience ensures strong, lasting results and avoids defects like bubbling or peeling later on.
- Transparent process and customer focus build trust: Expert shops like Auto Clinique provide clear updates, honest estimates, and service guarantees, so you drive away with total confidence every time.
For a paint finish that preserves both beauty and value, follow these pro insights—excellence is in the details, and the results are made to last.
Review the full article for a guided walk through each step and pro tips that keep your vehicle looking its absolute best.
Introduction
Ever noticed how some cars turn heads with a finish that gleams brilliantly, while others lose their luster in just a couple of years—even if they started the same way?
Here’s a fact: up to 80% of paint failures—peeling, bubbling, dull edges—can be traced back to shortcuts in preparation and process, not just the paint itself.
For Dallas drivers, a flawless paint job isn’t just about looks—it’s about protecting your investment against rust, harsh sun, and everyday dings.
When you trust your vehicle to Auto Clinique, you’re choosing more than a new coat of color. You’re ensuring:
- Expert surface prep that prevents costly rework
- The use of advanced primers and paints tailored to local weather
- Transparent updates and honest recommendations at every step
- Durability and depth that can actually boost resale value
Today’s market trends—from eco-friendly paints to cutting-edge color-matching—mean there are more ways than ever to preserve and personalize your car.
But industry data proves time and again: no technology, no quick-fix product can replace meticulous craftsmanship. Every stage, from cleaning to clearcoat, makes the difference between short-term shine and lasting brilliance.
In this guide, you’ll discover the no-nonsense steps that separate “good enough” from truly professional results:
- The hidden importance of comprehensive prep
- Choosing the right primer and color system for Texas conditions
- Application techniques that guarantee even, vibrant coverage
- Polishing and quality control that seal in excellence
If you want a finish you’ll feel proud of—one that stands up to downtown traffic or the Texas sun—the process matters as much as the paint itself.
Let’s take a closer look at what makes a high-quality automotive finish, and why the journey from surface to shine sets the standard in customer satisfaction and vehicle value.
Understanding the Foundations of Automotive Painting
Every expertly painted vehicle on Dallas roads is the result of a carefully executed, multi-phase paint process—where attention to detail transforms lasting value and appearance.
Auto Clinique knows that professional paintwork isn’t just about color; it’s about protecting your investment against time, weather, and daily wear.
The Role of Paint in Vehicle Longevity and Appeal
A high-quality automotive paint job is your primary defense against:
- Rust and corrosion from Texas humidity and unpredictable weather
- UV fading, scratches, and chemical damage from road debris or accidents
- Peeling and bubbling, which occur far more often in rushed or low-quality jobs
A professional finish can add up to 15% to your car’s resale value, while DIY or budget work often falls short after just 2-3 years compared to the 5-7 year durability of a shop-quality application.
Today’s trends include:
- Eco-friendly paints (like low-VOC or waterborne systems) reducing environmental impact
- Advanced color-matching technology for effortless touch-ups
- Premium tri-coat finishes (think deep pearls and metallics) for showstopping gloss
“A flawless factory finish is more than looks—it’s armor for your car.”
Defining a High-Quality Automotive Finish
You can spot a true expert paint job by its sensory appeal:
- Gloss and depth that reflects like glass—no roughness, no dull spots
- Consistent color, no haze or streaks, from panel to panel
- Smooth edges with zero overspray on trim or glass
Leading shops like Auto Clinique set the standard by offering:
- Transparent process updates from estimate to delivery
- Clear explanations of all products and steps
- Service guarantees so customers have total peace of mind
Picture this: your vehicle, restored to better-than-factory shine, with every edge double-checked for perfection under professional LED lights—a finish you can be proud of whether parked downtown or ready for a road trip.
The real takeaway? Methodical, transparent painting preserves both beauty and value. Auto Clinique’s signature process gives you the confidence of expert care and a finish designed to last—no technical knowledge required to appreciate true craftsmanship.
Step 1: Surface Preparation – Laying the Groundwork
A flawless paint finish starts with one crucial step: meticulous surface preparation.
Industry estimates show 80% of paint failures—from peeling to bubbling—can be traced back to skipped or rushed prep work.
Nothing underlines Auto Clinique’s quality commitment like investing the time to get this stage right.
Picture this: grimy residue, faint scratches, or overlooked dents left on the surface will show through every layer—ruining even the most advanced paints.
“Every perfect finish starts with surfaces too clean and smooth to fail.”
—
Cleaning and Decontamination
Professional techs remove every trace of dirt, grease, wax, and previous polishes using:
- Solvent-based degreasers
- Pre-painting cleaning sprays
- Lint-free, clean microfiber or tack cloths
Always wash then dry-wipe while the panel is still damp.
Removing streaks and watermarks at this stage prevents hidden defects later.
“If it’s not spotless, it’s not ready for paint.”
—
Sanding, Stripping, and Smoothing
Prepping for paint means leveling every square inch for maximum adhesion.
Key steps include:
- Dry sanding with 80–180 grit (rust/old finish removal)
- Switching to 320–600 grit for final smoothness
- Using cross-hatch patterns and rigid sanding blocks to keep flat panels wave-free
Pay special attention to:
- Panel edges and seams (commonly missed spots for corrosion)
- Aggressive sanding where rust lurks
—
Body Repairs and Filling Imperfections
For dents or gouges, quality filling is essential:
- Mix and apply body filler (skim-coat, smooth strokes)
- Allow 15+ minutes to cure, then sand with 80 grit
- Inspect with guide coat spray—reapply and smooth as needed
“Shadows and ripples only get bolder after paint; eliminate them now.”
—
Masking and Protection
Protect every non-painted inch for a shop-quality result.
Mask like a pro:
- Use automotive-grade tape for crisp lines
- Apply masking paper or foam around trim, glass, and gaps
- Remove or wrap small parts and mirrors—overspray travels fast
Every sharp edge and surface matters for a clean reveal.
—
Surface Preparation Best Practices
Keep tools and materials separated for each stage—no cross-contamination allowed.
Follow these absolute rules:
- Clean, store, and label sandpaper and masking supplies
- Apply a guide coat for final sanding visibility
- Never rush through cure times or skip inspection
Skipping prep steps can triple rework costs and disappoint future buyers.
—
A truly professional paint job begins long before color meets metal—it’s built on invisible groundwork.
Takeaway: 80% of a stunning finish is hidden in prep, not paint. Invest the extra hour here, and the results will speak for themselves.
Step 2: Primer Application – Creating a Lasting Bond
Applying primer is the critical second step—think of it as the handshake between your surface prep and the vibrant basecoat to come. If you skip or skim on primer, you risk paint that peels, bubbles, or fades before you even get to admire it.
Proper primer use boosts adhesion, seals out moisture, and hides small imperfections for a pro-level finish that lasts for years on Dallas roads.
Primer Types and Their Uses
Each primer is engineered for a specific role. Choosing the right one adds years to your paint job:
- Etching primer: Grips to bare metal and locks out rust—crucial for exposed panels or spot repairs
- High-build primer: Fills in sanding scratches, minor dings, and makes the surface ultra-smooth
- Sealer primer: Evens out color and texture so your basecoat pops, especially when working over repairs or mixed old/new surfaces
- Specialty (epoxy, zinc-rich): Delivers rock-solid adhesion and extra corrosion defense for challenging areas
With the right choice, your surface is ready for whatever Texas weather throws at it.
Applying Primer: Methods and Sequence
The pros at Auto Clinique follow a layered approach for durability:
- Spray 2–3 thin coats, allowing 10–15 minutes “flash time” between each
- Mix and thin the primer exactly per spec—incorrect ratios cause clogs or poor bonding
- Use even, overlapping strokes, starting at the roof and working down, to avoid patchy coverage or runs
- Allow up to 2–3 days for full curing before moving on—patience pays off in lasting results
Watch as dull, unfinished metal transforms into a uniform, ready-to-paint surface—this is your new blank canvas.
Primer Sanding and Surface Refinement
After primer cures, sanding refines your surface for a glassy finish:
- Use 320–600 grit sandpaper for major smoothing, then finish with 2000 grit if needed for powdery spots
- Sand in cross-hatch motions for level results and use a guide coat to spot any lingering dips or high spots
- Inspect for any powder residue or slow-drying areas—rush here, and your basecoat may show every flaw
Picture this: A perfectly smooth, primed hood reflecting shop lights—ready for color.
Choosing and applying the right primer at this stage ensures your color stays bright and your finish resists Texas sun, hail, and humidity. A successful primer step is your ticket to a showroom finish you’ll want to show off—because lasting quality starts beneath the surface.
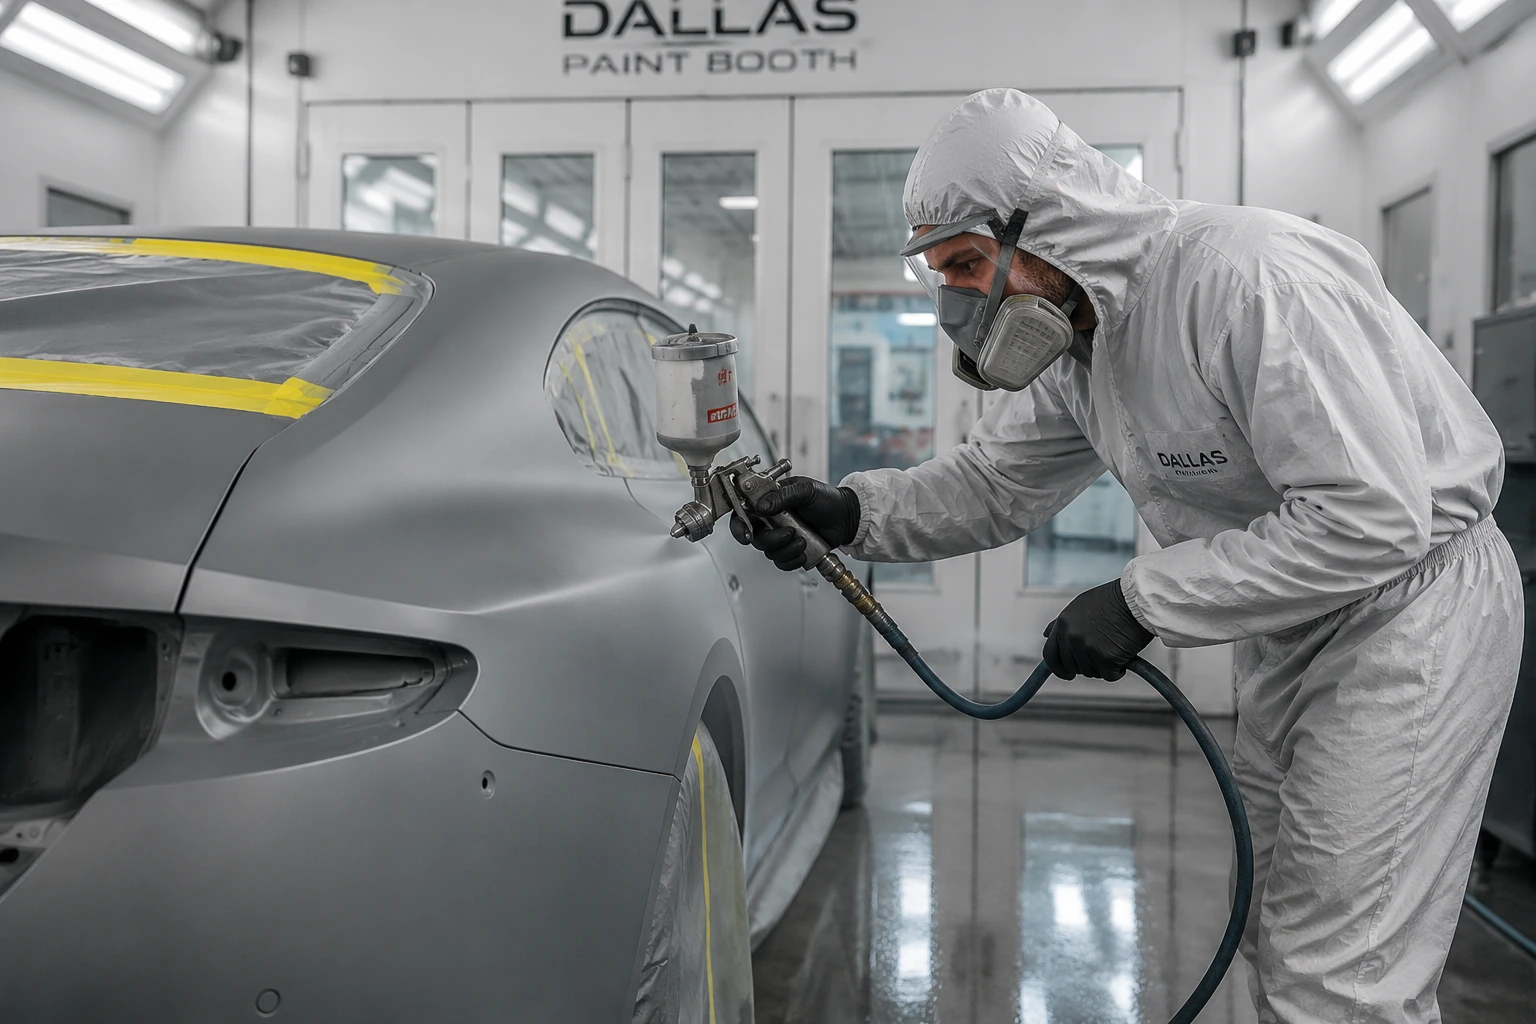
Step 3: Basecoat Application – Achieving True Color and Coverage
The basecoat stage is where your vehicle’s finished color appears—this is the part most owners remember best.
A flawless basecoat transforms prep work into a vivid, standout finish, setting the tone for gloss and uniformity.
Even a minor mistake, like uneven spray or letting dust sneak in, can leave waves, stripes, or shadowy patches that dull the car’s appeal.
Choosing the Right Paint System
Today’s paint buyers have two key choices:
- Solvent-Based Basecoats: Traditional favorite for deep color and classic durability, but higher VOC emissions.
- Waterborne Basecoats: Fast-rising eco-friendly option approved by more brands; lower odors and reduced environmental impact, but require exact humidity and airflow control in the spray zone.
Matching the original OEM shade isn’t guesswork—digital spectrophotometers and precise mixing tools can replicate factory or custom colors with remarkable accuracy.
For a visual: Picture a red sedan under bright lights, its hue perfectly matching each panel—no guessing, no fading, just seamless color.
Professional Spray Application Techniques
Using the right spray system is as critical as the paint itself. Pros choose among:
- Conventional Air: Delivers silky gloss, ideal for show-stopping finishes.
- HVLP (High Volume Low Pressure): Industry standard; less overspray means less waste, even layers, and safer air.
- Airless: For speed or thick undercoats.
- Electrostatic: Wraps paint evenly around curves, stellar for metallics or intricate OEM components.
Key best practices:
- Maintain a consistent 6-inch spray distance.
- Overlap each spray pass by 50% for uniform coverage.
- Only trigger the spray while moving to prevent heavy, drippy spots.
Here’s a quick guide for the shop wall or glove box:
| Spray Tech | Standout Benefit | Best Use Scenario |
|---|---|---|
| Conventional Air | Maximum gloss | Premium color/clear jobs |
| HVLP | Minimal overspray | Most modern repairs |
| Airless | High speed, thick coats | Primers/hidden panels |
| Electrostatic | Even wrap, saves paint | Complex, multi-part areas |
Best Practices for Basecoat Success
Remember: Multiple thin coats with full flash times (typically 15-20 minutes each) are far better than a single heavy layer.
To avoid pitfalls, always:
- Strain every batch of paint to prevent nozzle clogs.
- Clean the spray area and your gear thoroughly between coats.
- Scan for errors like uneven color, gun spit, or compromised overlap before moving on.
Skipping these steps risks streaks, patchy cover, or future peeling—making a pro job look “DIY.”
A memorable moment: imagine watching your vehicle’s new color gleam and transform under shop lights; even, rich, and unmistakably professional.
In summary, an expert basecoat sets every car up for showroom shine and long-lasting pride. The secret lies in thin, even layering, precise technique, and the right paint system—every time.
Step 4: Clearcoat Application – Adding Protection and Shine
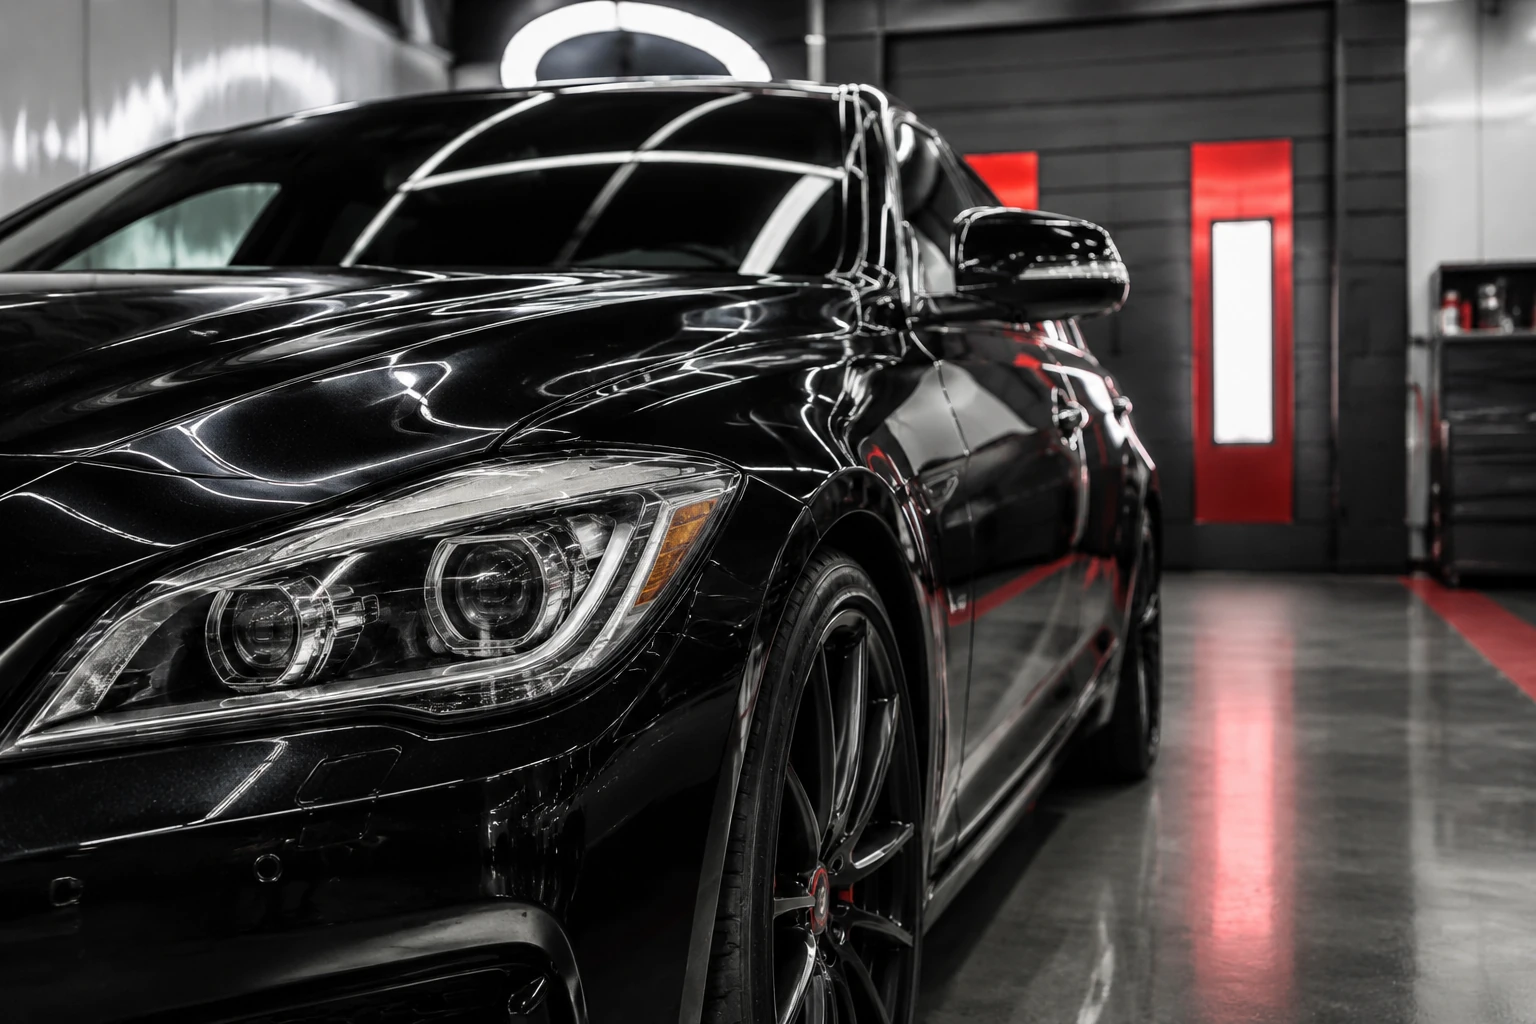
Picture this: your vehicle’s color looks bold and deep, but it’s the clearcoat that gives it showroom gloss and long-term protection.
Clearcoat is the final, invisible armor that shields paint from UV rays, Texas dust, stone chips, and harsh weather. This layer is what separates a true professional finish from an average one, ensuring your car’s vibrant look endures for years.
A flawless clearcoat isn’t just about beauty; it’s crucial for preserving your investment. The right application defends against fading, oxidation, and everyday wear.
Applying Clearcoat: Process and Products
For Dallas drivers, high-solids, UV-resistant clearcoats are best—they combat heat and sunlight found in Texas climates.
Professional results come from this precision layering process:
- Apply 2–3 thin coats with even, wet passes
- Allow 10–20 minutes of flash/dry time between coats
- Maintain a consistent wet edge to avoid dry spots or hazing
- Begin at the roof and work downward for full coverage
Timing matters—remove masking while the final coat is still tacky for the cleanest, sharpest lines and zero paint lift.
“A mirror finish is made in the moments between each coat—patience is as important as technique.”
Technique Tips for Premium Gloss
Avoid costly rework by focusing on these essential spray techniques:
- Hold the spray gun 6–8 inches from the surface, moving side-to-side in overlapping strokes
- Trigger only while moving to prevent sags or runs
- Aim for 70% overlap to ensure smooth, even coverage
- Stay alert for “orange peel,” runs, or debris—if seen, pause and correct immediately
Environmental controls are non-negotiable. The optimal setting is:
- Temperature: 70–80°F
- Humidity: Below 60%
- Airflow: Moderate, with filtered intake to block dust
“Professional results aren’t just achieved—they’re protected at every step, from prep to cure.”
Crisp Edges and Enduring Brilliance
The clearest sign of expert care? Razor-sharp panel lines and a glassy finish that feels as smooth as it looks.
With these practices, your vehicle’s color and shine will stand the test of time, exceeding even factory quality. The secret: every great clearcoat is built on the detail you can’t see during application, but can feel every time you run your hand across the surface.
Step 5: Finishing, Polishing, and Quality Control
Wet Sanding and Surface Correction
For a mirror-smooth finish, wet sanding is essential—this is where a good paint job becomes truly great.
Start by inspecting the clearcoat under strong, direct lighting.
- Use 1200 to 2000 grit wet sandpaper and a gentle lubricant (like soapy water) to refine high spots, remove dust nibs, and smooth minor texture.
- Mark flawed areas with a guide coat; lightly sand using a firm sanding block in even, circular strokes.
Picture this: as you sand, water beads and clear surfaces emerge—flaws disappear, and the paint feels as smooth as glass under your fingertips.
A single missed speck or swirl can ruin the final look, so patience here pays big rewards.
Compounding and Polishing Techniques
Once the surface is flat, restore depth and shine through compounding and polishing.
- Start with a heavy-cutting compound and wool pad for deep imperfections or severe orange peel.
- Move to a medium compound and firm foam pad for moderate hazing or swirl marks.
- Pay attention: soft foam pads and light polish deliver that final, showroom gloss.
Whether by hand or machine, proper pad care is crucial—always clean pads between stages and use dedicated products for each correction level to avoid cross-contamination.
Machine polishers (rotary or DA) increase efficiency on large panels, but delicate areas may need hand polishing for maximum control.
#### Correction Level and Product Selection Table
| Correction Level | Pad Type | Compound | Speed/Motion |
|———————-|——————-|——————|———————–|
| Heavy | Wool/microfiber | Heavy | High/slow, firm |
| Medium | Firm foam | Medium | Medium/moderate |
| Light/Finishing | Soft foam | Light polish/wax | Low/fast, gentle |
Quick tip: “Buff slow, finish fast—keep pads cool and your paint flawless.”
Final Inspection, Cleaning, and Protection
After polishing, do a meticulous final inspection in varied light: direct, angled, and shadowed.
- Use a tack cloth and paint-safe spray to remove compound residue or lint.
- Walk the vehicle with the customer and spotlight the finish—customer satisfaction comes from this moment of shared pride.
- For protection, offer options like premium carnauba wax, ceramic coatings, or clear protective film to lock in that gloss for months, not just days.
Keeping your tools and work area immaculate signals a commitment to lasting results and total customer focus.
A flawless automotive finish means every detail is checked and protected, ensuring your vehicle leaves the shop looking—and staying—its absolute best. Touch this finish and you’ll feel the difference: that’s the Auto Clinique promise.
Essential Best Practices & Common Mistakes to Avoid
Environmental and Safety Controls
A clean, dust-free spray zone is the #1 predictor of a flawless paint job. Even a single piece of debris can ruin a high-gloss finish and lead to costly rework.
Every technician at Auto Clinique uses:
- Professional ventilation to keep the air clear
- Face masks, gloves, and coveralls to shield skin and lungs from paint chemicals
- Regular booth wipes and air tests, ensuring each job meets OSHA safety standards
Picture this: You’re admiring your freshly-painted bumper, only to spot a hair-like streak trapped under the clearcoat. That’s why “prep is 80% of success”—it’s not just a saying, it’s the standard in Dallas’ best shops.
“A dust-free booth isn’t an option. It’s the only way to guarantee perfection.”
Timelines, Curing, and Repair Scheduling
Rushing paint layers is a top cause of bubbling, solvent pop, or peeling months down the road.
For professional results, always:
- Respect recommended flash and cure times:
- Primer: 10-15 minutes between coats, then cure 2-3 days
- Basecoat: Allow each layer full flash (per product)
- Clearcoat: 10-20 minutes between coats, don’t touch until fully cured
- Schedule your repairs based on paint system requirements—don’t stack jobs back-to-back when humidity or temperature soar
A single shortcut in cure time can cost hundreds in future re-dos and customer callbacks.
Maintaining Tools and Materials
Cross-contamination, old paint, or a dirty spray gun can sabotage an otherwise perfect finish.**
Our essential checklist before every job:
- Thoroughly clean and inspect all guns, rags, and containers
- Use only fresh, filtered paint and mixing materials
- Never reuse contaminated tools—dedicated equipment for each stage prevents costly failures
“Great paint is built on good habits and obsessive tool hygiene.”
Troubleshooting and Case Examples
Common paint nightmares—like orange peel, runs, fisheyes, or poor adhesion—are all preventable with methodical process and experience.
If an issue appears, Auto Clinique follows these steps:
- Diagnose the root cause (e.g., improper cure, dust, mix error)
- Isolate and sand imperfections
- Reapply and blend using proper technique
- Review a real Dallas case: A client’s hood had visible streaks from rushed curing. After controlled sanding, a fresh base, and patient flash times, the finish returned to showroom shine—at no extra charge.
“We fix what others miss—attention to detail is our Dallas trademark.”
At every step, precision, patience, and a dust-free environment are what turn a good repair into an unforgettable one. Prioritize these practices and you’ll avoid the pitfalls that separate pro-grade paintwork from DIY regrets.
For professional ventilation standards and paint booth safety practices, review the OSHA automotive paint safety guidelines before beginning any refinishing work.

Conclusion
Achieving a stunning, durable automotive finish is about more than good looks—it’s about protecting your investment and ensuring every drive feels like a new beginning.
The Auto Clinique approach empowers you with knowledge so you can make confident choices and demand the quality your vehicle deserves.
Whether you’re caring for a daily workhorse or restoring a beloved classic, the right process ensures your car stands out for years—not just in appearance, but in long-term value.
—
Key Takeaways for an Unmatched Paint Finish:
- Meticulous prep eliminates 80% of common paint issues—never rush or skip surface cleaning, sanding, and inspection.
- Choose products—primer, basecoat, and clearcoat—matched to your climate and driving habits for true, long-lasting results.
- Apply every layer with patience and precision, respecting recommended cure and flash times to avoid future peeling or fading.
- Maintain a clean, dust-free workspace and use dedicated tools for each stage—professional results start with a pristine environment.
- Insist on transparent, step-by-step communication from your repair shop so you know exactly how your finish is achieved.
—
Next Steps for Vehicle Owners:
- Inspect your current vehicle’s finish; note any imperfections or early wear, then ask questions at your next service visit.
- Schedule a professional consultation with Auto Clinique—bring your concerns and see our craftsmanship firsthand.
- Request a breakdown of the paint process before any repair; clear expectations lead to lasting results.
- Share these best practices with friends and family—everyone deserves the confidence of driving a car that looks its best.
—
A premium paint job is more than a one-time upgrade—it’s the assurance that your car will look great and stay protected for years to come.
The difference is visible, but the real value is in every unseen detail.
Let your ride reflect the pride you take in every mile.
Ready for a finish that stands the test of Texas roads? Let’s make every vehicle shine—together.
f your vehicle has dents, scratches, or accident damage before repainting, our collision repair services help restore panels properly before the automotive paint process begins.
FAQs
What is the most important step in the automotive paint process?
Surface preparation is the most important step because poor cleaning, sanding, or masking can cause peeling, bubbling, and premature paint failure.
How long does the automotive paint process take?
A professional automotive paint process can take anywhere from 2 days to over a week depending on repairs, curing times, sanding, and polishing requirements.
Why is primer necessary before painting a car?
Primer improves paint adhesion, seals bare metal, prevents corrosion, and creates a smooth surface for the basecoat and clearcoat.
What grit sandpaper is used during automotive paint preparation?
Technicians commonly use:
- 80–180 grit for stripping and shaping
- 320–600 grit for primer sanding
- 1200–2000 grit for wet sanding and polishing
What causes automotive paint peeling?
Common causes include:
- Poor surface preparation
- Moisture contamination
- Skipping primer
- Improper flash times
- Cheap paint materials
How long does automotive clearcoat last?
A properly applied high-quality clearcoat can last 5–7 years or longer with proper washing, waxing, and UV protection.
Are waterborne automotive paints better?
Waterborne paints are more eco-friendly and produce lower VOC emissions while still delivering excellent color matching and durability when applied correctly.